
Dip powder manicures offer a durable, long-lasting alternative to traditional polish, gaining immense popularity for at-home use.
These kits empower individuals to achieve salon-quality results conveniently and affordably, transforming the DIY manicure experience.
The appeal lies in the simplicity and longevity, making dip powder kits a game-changer for nail enthusiasts seeking a glossy, resilient finish.
Many find the in-salon process questionable regarding sanitation, driving the demand for controlled, hygienic at-home solutions like these innovative kits.
What is a Dip Powder Manicure?
Dip powder manicures represent a revolutionary approach to nail enhancement, differing significantly from traditional polish, gel, or acrylic applications. Instead of brushing on liquid polish, a base coat is applied, and then your nails are dipped into a finely milled powder. This process is repeated, layering the powder to build strength and color.
The key to the durability lies in the activator, a special liquid that hardens the powder, creating a robust and long-lasting finish. Unlike gel, UV or LED curing isn’t required, making it a convenient option. It’s also generally considered less damaging to the natural nail than acrylics, as it doesn’t require extensive filing.
Many are drawn to dip powder due to concerns about salon hygiene, as DIY kits offer a controlled and sanitary application. The result is a beautiful, chip-resistant manicure that can last for up to three weeks, providing a glossy and professional look without the salon visit.
Benefits of Using a Dip Powder Kit
Dip powder kits offer a compelling array of advantages, making them a popular choice for at-home manicures. The most significant benefit is cost savings; achieving salon-quality nails becomes substantially more affordable, eliminating recurring salon expenses.
Convenience is another key factor, allowing you to enjoy a beautiful manicure on your own schedule, without appointments or travel time. Control over hygiene is paramount, addressing concerns about sanitation often associated with salon visits. You dictate the cleanliness of your tools and environment.
Durability is exceptional, with manicures lasting up to three weeks without chipping or fading. Furthermore, dip powder is generally less damaging to the natural nail compared to acrylics, promoting healthier nail growth. The wide range of colors and finishes available allows for endless creative expression, empowering you to personalize your look.
Dip Powder vs. Gel vs. Acrylic: A Comparison
Dip powder, gel, and acrylic manicures each present unique characteristics. Acrylics, known for their strength, involve mixing liquid monomer with powder polymer, creating a durable but potentially damaging overlay. Gel polish offers a glossy finish and moderate durability, cured under UV or LED light, but can also weaken nails over time.
Dip powder strikes a balance, providing impressive durability – often exceeding gel – without the strong chemical odor or extensive filing associated with acrylics. It’s generally considered less damaging than both, as it doesn’t require harsh buffing for application.
Compared to gel, dip powder typically lasts longer and is less prone to chipping. While acrylics offer the most significant structural changes (like extensions), dip powder excels in providing a natural-looking, long-lasting color enhancement. Ultimately, the best choice depends on individual nail health and desired aesthetic.

Understanding Your Dip Powder Kit
Dip powder kits contain everything needed for a salon-quality manicure at home, offering convenience and cost savings. Mastering the components unlocks beautiful, long-lasting results.
These kits empower users to achieve professional-looking nails, eliminating the need for frequent salon visits and providing creative freedom.
Components of a Standard Dip Powder Kit
A typical dip powder kit, like those from Kiss, includes several essential components for a complete manicure. First, you’ll find a base coat, crucial for adhesion and protecting your natural nail. Next is the dip powder itself, available in a vast array of colors and finishes – from classic creams to shimmering glitters.
Activator is a key element, initiating the polymerization process that hardens the powder. Top coat provides a durable, glossy seal, protecting your design and adding shine. Many kits also include a brush saver to prevent the base coat from solidifying within the brush.
You’ll often find a buffer and file for shaping and smoothing the nails, ensuring a professional finish. Some kits include a cuticle pusher and nail dehydrator for optimal preparation. Finally, a detailed instruction manual guides you through each step, making the process accessible even for beginners.
Understanding each component’s role is vital for a successful and long-lasting dip powder manicure.
Types of Dip Powder Available (Colors, Finishes)
Dip powder boasts an incredible spectrum of colors, catering to every style and preference. Beyond the standard cremes – reds, pinks, nudes – you’ll discover a dazzling range of shades, including pastels, neons, and jewel tones. Kiss dip powder kits frequently offer curated color collections for trending looks.
Finishes add another dimension to your manicure. Shimmer powders provide a subtle sparkle, while glitter powders deliver a bold, eye-catching effect. Matte powders offer a sophisticated, modern aesthetic. Some powders even incorporate holographic or iridescent particles for a unique, multi-dimensional look.
Specialty powders, like French dip powders, simplify creating classic French manicures. Temperature-sensitive powders change color with heat, adding a playful touch. The variety ensures you can achieve any desired look, from understated elegance to vibrant artistry.
Experimenting with different colors and finishes is a key part of the dip powder experience.
Essential Tools Beyond the Kit
While Kiss dip powder kits provide a solid foundation, several additional tools elevate the application and refinement process. A quality cuticle pusher (metal or wooden) is crucial for gently preparing the nail bed. Invest in a good nail file – 180/240 grit is versatile – for shaping and refining.

Buffing blocks are essential for smoothing the surface between layers, ensuring a flawless finish. A soft dust brush effectively removes excess powder during application. Lint-free wipes paired with dip powder liquid (activator and top coat) prevent streaks and bubbles.
For intricate designs, consider nail art brushes and dotting tools. A UV/LED lamp isn’t typically required for dip powder, but can be used to quickly cure the top coat for added durability. Finally, cuticle oil is vital for post-manicure hydration and nail health.
These additions enhance control and precision.

Step-by-Step Dip Powder Application
Achieving a flawless dip powder manicure at home is surprisingly accessible with a quality kit. This process delivers salon-worthy results, offering durability and shine.
Follow each step carefully for optimal adhesion and a long-lasting, beautiful finish, transforming your nails effortlessly.
Step 1: Nail Preparation ⎯ Cleaning and Shaping
Proper nail preparation is paramount for a flawless and long-lasting dip powder manicure. Begin by gently removing any existing polish with a non-acetone remover, ensuring a clean slate for application.
Next, wash your hands thoroughly with soap and water to eliminate oils and residue that could hinder adhesion. Shape your nails to your desired length and form using a file; a consistent shape contributes to a professional look.
Gently push back your cuticles with a cuticle pusher – avoid cutting them, as this can lead to infection. Lightly buff the surface of your nails to create a slightly rough texture, enhancing the base coat’s grip.
Finally, dehydrate the nail plate using a nail dehydrator or rubbing alcohol to remove any remaining oils. This crucial step prevents lifting and ensures optimal powder adhesion, setting the stage for a beautiful, durable manicure.
Step 2: Applying the Base Coat
With your nails prepped, it’s time to apply the base coat – the foundation for your dip powder manicure. Apply a thin, even layer of the Kiss Dip Powder Base Coat to one nail at a time, avoiding the cuticle area and sidewalls.
Ensure complete coverage, but avoid applying the base coat too thickly, as this can lead to bubbling or unevenness. Work quickly, as the base coat is designed to be tacky to grip the powder, and you want to maintain that tackiness.
Repeat this process for all nails on one hand before moving to the other. This ensures consistent application and prevents the base coat from drying before you’re ready to dip.
The base coat acts as an adhesive, creating a strong bond between your natural nail and the dip powder, crucial for longevity and preventing lifting. A smooth, even base is key to a flawless finish.
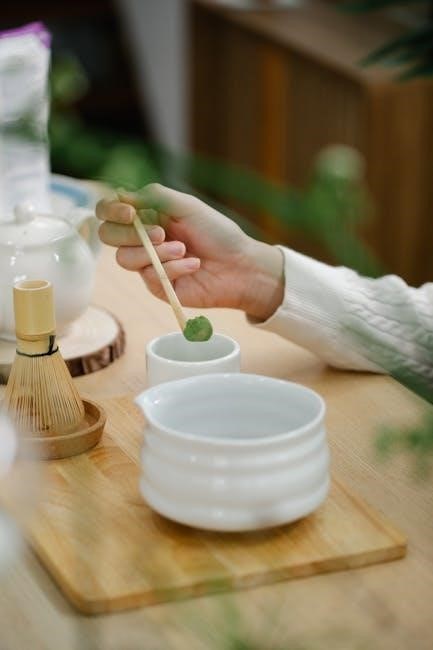
Step 3: The First Dip ⎯ Technique and Coverage
Now for the dip! Immediately after applying the base coat to a nail, gently dip it into the Kiss Dip Powder at a 45-degree angle. Avoid scooping or plunging; instead, lightly tap the surface of the powder to pick up a generous, even coating.
Don’t worry about perfection on the first dip – the goal is to establish a foundational layer. Tap off any excess powder before lifting your finger from the container. Repeat this dipping process for each nail, working one hand at a time.
Ensure the powder covers the entire nail surface, but avoid getting it on the skin. A slight build-up around the edges is okay; it will be filed later. This first dip creates the initial color and structure of your manicure.
Remember, a controlled dip is vital for even coverage and a smooth, professional-looking result.
Step 4: Filing and Buffing ⎯ Smoothing the Surface
After the first dip and before proceeding, it’s crucial to file and buff the nails. Using a fine-grit file (180-240 grit), gently shape and smooth the surface of each nail. Focus on refining the edges and removing any unevenness caused by the powder application.
Pay attention to the cuticle area, ensuring the powder doesn’t extend onto the skin. Buff the entire nail surface with a buffing block to create a flawlessly smooth canvas for the next dip. This step is essential for a professional finish and prevents chipping.
Remove dust thoroughly with a clean brush after filing and buffing. A smooth surface ensures better adhesion for subsequent layers and contributes to the overall durability of the manicure.
Don’t apply excessive pressure during filing; gentle, controlled strokes are key to achieving the desired result.
Step 5: Second Dip ⎯ Building Strength and Color
Now, apply a second coat of the base coat to one nail at a time, ensuring even coverage, but avoid the cuticle area. Immediately dip your nail into the chosen dip powder at a 45-degree angle. Gently tap off any excess powder, and use a brush to remove any remaining particles around the cuticle and sidewalls.
This second dip builds upon the first, adding strength and intensifying the color. Repeat this process for each nail, working one at a time to prevent the base coat from drying. The goal is to achieve consistent coverage and a more opaque color payoff.
Remember to tap, don’t press, into the powder to avoid contamination. This step is vital for a long-lasting and beautiful manicure.
Step 6: Additional Dips (Optional) ⎯ For Desired Thickness
If you desire a thicker, more durable nail, or if the color still appears slightly sheer after the second dip, you can apply additional coats of base coat and dip powder. Repeat the dipping process – base coat application followed immediately by dipping into the powder – for each nail, one at a time.
Each additional layer contributes to the overall strength and opacity of the manicure. However, avoid applying too many layers, as this can lead to an uneven or bulky finish. Typically, two to three dips are sufficient for most desired results.
Remember to consistently tap off excess powder and refine the edges with a brush after each dip. Patience is key to achieving a smooth, professional-looking finish.
Step 7: Activator Application ‒ Polymerization
Once you’ve completed all desired dips, it’s time to apply the activator. This crucial step hardens, or polymerizes, the dip powder, creating a durable and long-lasting manicure. Generously apply the activator to all nails, ensuring complete coverage.
The activator works quickly, so work efficiently. Allow the activator to dry completely – typically around 2 minutes – before proceeding to the next step. You’ll notice the powder becoming firm and solidifying as it reacts with the activator.
Avoid getting activator on the skin, as it can cause irritation. If contact occurs, wash the area thoroughly with soap and water. Proper activator application is essential for a successful and long-lasting dip powder manicure.
Step 8: Filing and Buffing (Again) ‒ Refining the Shape
After the activator has fully dried, it’s time for a second round of filing and buffing. This step refines the shape of your nails and smooths out any imperfections created during the dipping process. Use a medium-grit file to shape the nails to your desired length and form, paying attention to the sidewalls and free edge.
Follow up with a buffing block to smooth the surface of the nails, removing any ridges or bumps. This creates a flawless canvas for the top coat. Be gentle during this process to avoid damaging the underlying dip powder layers.
Dust off any filing debris with a clean brush before moving on to the final steps. A smooth, even surface is key to a professional-looking dip powder manicure.

Finishing Touches & Maintenance
Final steps involve a protective top coat for lasting shine, careful cleanup of excess powder, and proper aftercare to maximize the manicure’s longevity and beauty.
Maintaining vibrant, chip-resistant nails requires gentle handling and regular hydration of cuticles for optimal results.
Safe removal is crucial to prevent nail damage, ensuring a healthy base for future applications.
Step 9: Applying the Top Coat ⎯ Shine and Protection
Applying the top coat is the crucial final step, sealing in the color and providing a durable, glossy finish. Begin by ensuring your nails are completely dry after the activator application and final buffing. Gently brush on a generous, even layer of the top coat, covering the entire nail surface from cuticle to free edge.
Pay close attention to avoid flooding the cuticles, as this can cause lifting. Allow the first coat to dry completely – typically 2-3 minutes – before applying a second coat for enhanced shine and protection. This second layer reinforces the durability and extends the life of your dip powder manicure.
Ensure each coat is applied smoothly to prevent streaks or bubbles. The top coat acts as a shield against everyday wear and tear, keeping your nails looking salon-fresh for weeks. Remember to cap the free edge with each coat for maximum chip resistance.
Step 10: Clean Up ‒ Removing Excess Powder
Clean up is essential for a polished, professional-looking dip powder manicure. After applying the top coat, carefully inspect your nails for any residual powder clinging to the skin around the edges. Dip a small, angled brush into acetone or dip powder liquid (follow kit instructions).
Gently wipe away the excess powder, being cautious not to remove the polish from the nail itself. Work slowly and precisely, focusing on the cuticle area and sidewalls. A clean-up brush allows for targeted removal without disrupting the manicure’s integrity.
For stubborn residue, lightly dampen a cotton swab with acetone and carefully roll it along the skin. Avoid pressing too hard, as this can damage the polish. This final step refines the manicure, creating a crisp, clean finish that elevates the overall appearance and ensures a long-lasting, flawless result.
How to Remove Dip Powder Nails Safely
Safe removal is crucial to prevent nail damage. Avoid peeling or forcing the dip powder off, as this can strip layers of your natural nail. Begin by gently buffing the top coat to break the seal. Saturate cotton balls with acetone – the key to dissolving the dip powder.
Place the acetone-soaked cotton balls onto your nails and wrap each fingertip tightly with aluminum foil. Allow the acetone to sit for 15-20 minutes, softening the dip powder.

Gently push off the softened powder with a cuticle pusher. Repeat if necessary. Once all powder is removed, moisturize your nails and cuticles with oil. Patience is key; rushing can lead to damage. Follow with a nourishing treatment to restore nail health after the removal process.
Dip Powder Nail Aftercare ⎯ Maintaining Longevity
Prolonging your manicure’s life requires consistent aftercare. Regularly apply cuticle oil to hydrate the nail bed and prevent lifting. Avoid using your nails as tools, as this can cause chips and breaks. Wear gloves when doing dishes or cleaning, protecting your manicure from harsh chemicals and prolonged water exposure;
If you notice any minor chips, gently buff the area and apply a thin layer of top coat for a quick fix. Avoid excessive hand washing and use a moisturizing hand cream frequently.
Consider a weekly application of a nail strengthener to maintain nail health between manicures. Proper aftercare ensures your dip powder nails remain beautiful and durable for weeks, maximizing your investment and enjoyment.

Troubleshooting Common Issues
Addressing challenges like thickness, lifting, or chipping is crucial for success. Allergic reactions, though rare, require immediate removal and avoidance of future applications.
Proper preparation and technique minimize these issues, ensuring a flawless and long-lasting dip powder manicure experience.
Dip Powder Too Thick or Uneven
Dealing with excessive thickness or an uneven surface is a common concern when starting with dip powder. The primary culprit is often applying too much powder during the dipping process, leading to a bulky appearance.
To mitigate this, ensure you’re gently tapping off excess powder before applying the activator. A light hand is key – think of dusting, not coating, the nail.
Filing is your friend! Invest in a good quality nail file and buffer. After each dip (and especially after the final activator application), meticulously file down any ridges or uneven areas. Focus on smoothing the surface, not drastically reducing thickness.
Buffing creates a polished, even canvas for the top coat. Remember to file in one direction to avoid creating new imperfections. If the thickness persists, consider fewer dips in subsequent applications.
Thin, even layers are always preferable to one thick, difficult-to-manage coat.
Dip Powder Lifting or Chipping
Lifting and chipping are frustrating issues, often stemming from inadequate nail preparation. Thoroughly cleanse the nail plate with alcohol to remove oils and debris – this is crucial for adhesion.
Ensure your nails are completely dry before applying the base coat. A dehydrated nail surface provides a better bond. Gently buff the nail surface to create texture, enhancing the base coat’s grip.
Wrap the free edge! During each dip, lightly brush the powder onto the free edge of your nail. This seals the layers and prevents water from seeping underneath, a major cause of lifting.
Apply activator generously, ensuring it penetrates all layers. Insufficient activator can lead to incomplete polymerization and weakened adhesion. Avoid prolonged water exposure immediately after application.
Finally, a quality top coat provides a protective barrier against daily wear and tear, extending the manicure’s lifespan.

Allergic Reactions to Dip Powder
Allergic reactions, though uncommon, can occur with dip powder, often due to the cyanoacrylate in the activator or components in the powder itself. Symptoms include redness, itching, swelling, and even blistering around the nail area.
If you have known allergies to acrylics or nail adhesives, exercise extreme caution and consider a patch test before a full application. Apply a small amount of the activator to your skin and monitor for a reaction over 24-48 hours.
Ensure proper ventilation during application to minimize inhalation of powder and fumes. Avoid skin contact with the powder and liquids as much as possible.
If a reaction develops, immediately remove the dip powder and discontinue use. Consult a dermatologist for appropriate treatment and advice. Consider hypoallergenic alternatives if sensitivities persist.
Always prioritize your health and well-being over a manicure; a reaction is a signal to stop and seek professional guidance.
Advanced Dip Powder Techniques
Elevate your skills with ombre effects, intricate nail art, and even minor nail repairs using dip powder. These techniques unlock creative possibilities!
Experiment with color blending and design placement to personalize your manicures, achieving professional-looking results at home with practice.
Dip powder’s versatility extends beyond basic application, offering a canvas for artistic expression and nail enhancement.
Ombre Dip Powder Nails
Creating an ombre effect with dip powder requires a slightly different approach than a solid color application, but the results are stunning. Begin with your base coat and, while still wet, gently dip your nail into your lighter dip powder color, focusing on the tip.
Next, lightly dust off any excess powder. Repeat this process, gradually moving further down the nail with each dip, blending the lighter shade into the base. Then, switch to your darker dip powder color and repeat the process, starting at the base of the nail and moving upwards, blending it into the lighter shade.
The key is to work quickly and blend the colors seamlessly. Filing and buffing are crucial for smoothing the transition between shades. Apply activator, file again for refinement, and finish with a top coat for a professional, polished ombre look. Practice makes perfect, so don’t be discouraged if your first attempt isn’t flawless!
Dip Powder Nail Art Designs
Unleashing creativity with dip powder extends beyond solid colors! Once you’ve mastered the basic application, explore nail art. Begin with a base dip color, then use a thin nail art brush to apply a small amount of adhesive (or a slightly tacky base coat) where you want your design.
Dip the brush into a contrasting dip powder color and gently press it onto the adhesive, building up the design. Alternatively, use stencils for precise shapes; For glitter effects, apply a glitter dip powder over a tacky base.
Seal your art with activator, ensuring it’s fully polymerized. Filing and buffing smooth any texture differences. Remember to work in thin layers to prevent bulkiness. Experiment with rhinestones, decals, or freehand painting after the dip powder application, securing them with nail glue and finishing with a protective top coat.
Using Dip Powder for Nail Repairs
Dip powder isn’t just for manicures; it’s a surprisingly effective nail repair tool! For minor tears or breaks, gently file the damaged area smooth. Apply a base coat specifically to the broken section, avoiding the healthy nail. Immediately dip into your chosen dip powder, focusing on building up the repair.
Tap off excess powder and allow it to adhere. Repeat this process, layering the dip powder until the break is reinforced and level with the natural nail. Filing is crucial here – carefully shape the repair to blend seamlessly with your nail.
Buff to smooth any unevenness. Continue with your regular dip powder manicure application over the entire nail, ensuring the repair is fully encapsulated for added strength and a flawless finish. This method offers a quick, durable fix before a full manicure.