
Moen One-Handle Pullout Kitchen Faucet: A Comprehensive Guide
Welcome! This detailed manual provides essential information for optimal use and care of your Moen faucet, ensuring lasting performance and satisfaction.
Explore features, installation, operation, maintenance, troubleshooting, and parts replacement – all within this comprehensive resource for your new kitchen fixture.
Understanding Your Moen Faucet
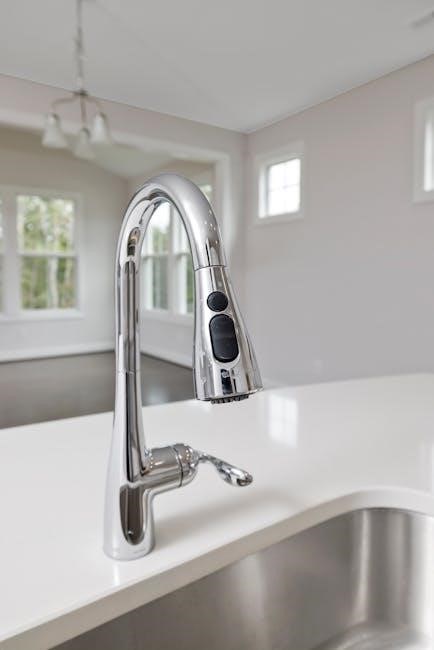
Moen faucets are renowned for their durability, innovative design, and user-friendly operation. Your one-handle pullout kitchen faucet is engineered for convenience, offering a flexible sprayer for various cleaning tasks and precise temperature and flow control.
This faucet model incorporates a single-handle design, simplifying operation with intuitive adjustments. The pullout sprayer extends your reach, making rinsing dishes and cleaning the sink easier than ever. Understanding the components – from the handle and spout to the sprayer head and aerator – is key to maximizing its functionality.
This guide will detail each part and its purpose, helping you navigate maintenance and troubleshooting. Familiarizing yourself with these aspects ensures a long-lasting, efficient, and enjoyable experience with your Moen kitchen faucet. Proper care and understanding will prevent common issues and maintain its pristine condition for years to come.
Faucet Model Numbers & Identification
Identifying your specific Moen faucet model is crucial for accessing the correct support, replacement parts, and documentation. The model number is typically located on the underside of the faucet, often on a sticker or stamped directly onto the metal. It may also be found on the original packaging or invoice.
Moen utilizes a standardized numbering system to categorize its products. This number provides detailed information about the faucet’s features, finish, and series. Knowing your model number allows you to quickly locate relevant manuals, diagrams, and troubleshooting guides online or through Moen’s customer service.
Record your faucet’s model number in a safe place for future reference. When contacting Moen for assistance, having this information readily available will expedite the process and ensure you receive the most accurate support. Accurate identification prevents ordering incorrect parts or receiving inapplicable advice.
Key Features of the One-Handle Pullout Design
The Moen one-handle pullout kitchen faucet offers exceptional convenience and versatility. Its single-handle operation allows for effortless control of both water temperature and flow with a simple movement. The pullout sprayer extends your reach, making it easy to rinse dishes, clean the sink, and fill pots.
This design incorporates a flexible hose that retracts smoothly and securely into the spout when not in use, maintaining a clean and uncluttered kitchen aesthetic. Many models feature Reflex® technology, ensuring quiet and reliable hose retraction.
The pullout functionality is ideal for multitasking in the kitchen. Enjoy increased maneuverability and efficiency during food preparation and cleanup. Moen’s commitment to quality ensures durability and long-lasting performance in this popular and practical faucet design.

Installation & Setup
Proper installation is crucial for optimal performance. This section details the necessary tools, a step-by-step guide, and instructions for connecting water lines safely and effectively.
Tools Required for Installation
Before beginning the installation process, gather all necessary tools to ensure a smooth and efficient experience. Having everything readily available will minimize interruptions and potential frustrations.
You will need an adjustable wrench – typically two are helpful – to tighten and loosen various connections. A Phillips head screwdriver is essential for securing mounting hardware. A flathead screwdriver may also be required for certain adjustments.
Plumber’s putty is vital for creating a watertight seal around the faucet base. Teflon tape is crucial for sealing threaded connections, preventing leaks. A basin wrench is highly recommended for accessing hard-to-reach nuts under the sink.
Safety glasses are a must to protect your eyes from debris. A work light will illuminate the under-sink area. Finally, have a bucket and towels handy to catch any water spills during the process. Consider a penetrating oil for stubborn connections.
Step-by-Step Installation Guide
Begin by shutting off the hot and cold water supply valves under your sink. Disconnect the existing faucet’s water supply lines. Carefully remove the old faucet from the sink deck, cleaning the surface thoroughly.
Apply plumber’s putty around the base of the new Moen faucet and insert it into the sink opening. Secure the faucet with the provided mounting hardware from underneath the sink, tightening evenly.
Connect the water supply lines to the faucet’s tailpieces, using Teflon tape on the threads to prevent leaks. Ensure a snug, but not overly tight, connection. Attach the pullout sprayer hose, verifying it moves freely.
Double-check all connections for tightness and proper alignment. Slowly turn the water supply valves back on, monitoring for any immediate leaks. Run the faucet to flush out any debris from the lines.
Connecting Water Supply Lines
Before connecting, inspect the hot and cold water supply lines for any kinks or damage. Apply Teflon tape clockwise around the threads of the faucet’s tailpieces to ensure a watertight seal.
Attach the flexible supply lines to the faucet’s tailpieces, hand-tightening initially. Then, using an adjustable wrench, gently tighten each connection another half to three-quarters of a turn. Avoid over-tightening, which can damage the fittings.
Connect the other ends of the supply lines to the corresponding hot and cold water shut-off valves under the sink. Again, hand-tighten first, then use a wrench for a secure, but not excessive, tightening.
Carefully examine each connection for any signs of leakage. If leaks are present, slightly tighten the connection until the leak stops. Remember to support the faucet body while tightening to prevent strain.
Checking for Leaks After Installation
Post-installation, thoroughly inspect all connections for leaks. Begin by slowly turning on the water supply valves, observing each connection point – where the supply lines meet the faucet and the shut-off valves.
Run both hot and cold water, alternating between them, and check for drips or moisture around the faucet base, handle, and pullout sprayer hose connection. Pay close attention to the connections under the sink, as these are often the source of initial leaks;
If you detect a leak, immediately turn off the water supply. Gently tighten the leaking connection with an adjustable wrench, being careful not to over-tighten. Retest after each adjustment.
Continue monitoring all connections for at least 24 hours after installation to ensure no slow leaks develop. A small drip can indicate a loose connection that needs further attention.
Operating Instructions
Familiarize yourself with your Moen faucet’s intuitive design. This section details how to effectively use the pullout sprayer, adjust temperature, and control water flow.
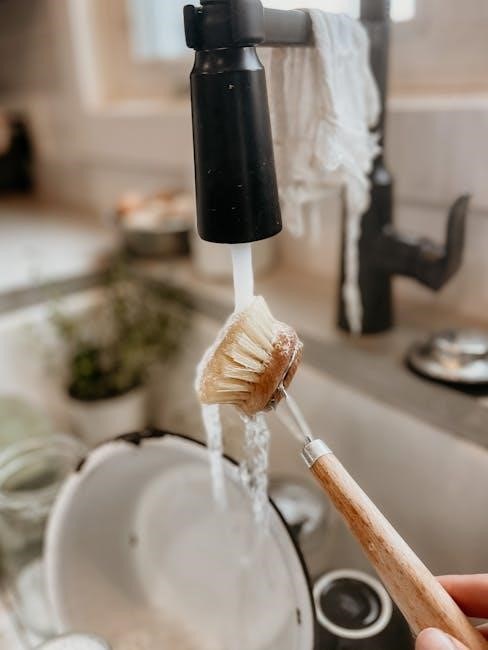
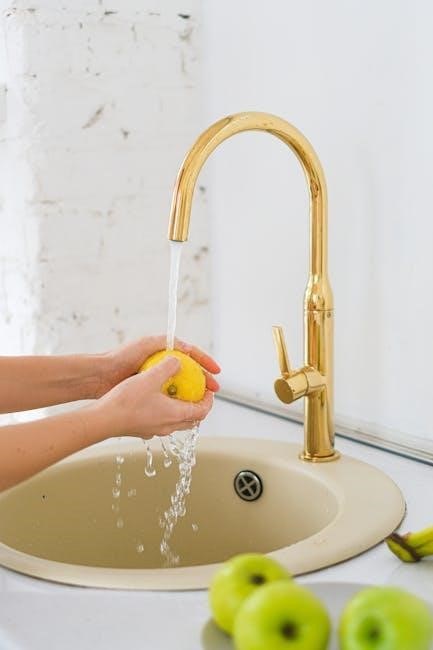
How to Use the Pullout Sprayer
The pullout sprayer on your Moen one-handle kitchen faucet offers enhanced versatility for various cleaning tasks. To activate the sprayer, gently pull the spray head upwards and outwards. It will extend smoothly, providing a focused stream of water.
Direct the spray towards the desired area, such as dishes, vegetables, or the sink itself. You can switch between a steady stream and a powerful spray pattern by pressing the button located on the spray head. This allows you to efficiently tackle different cleaning needs.
When finished, simply guide the sprayer back into its spout. A magnetic docking system ensures secure and effortless reattachment. The hose will retract automatically, providing a neat and organized appearance. Avoid forcing the hose, as this could potentially damage the internal mechanism. Regular use of the pullout sprayer will make your kitchen tasks easier and more efficient.
Adjusting Water Temperature
Your Moen one-handle faucet allows for precise temperature control with a simple, intuitive movement. To adjust the water temperature, move the handle smoothly from left to right. Moving the handle towards the left will gradually introduce colder water, while moving it towards the right will increase the water temperature.
Finding your desired temperature is quick and easy. The further you move the handle in either direction, the more extreme the temperature will become. Start with a moderate position and adjust incrementally until you reach your preferred comfort level.
Be cautious when initially adjusting the temperature, as hot water can be released quickly. Always test the water temperature with your hand before fully immersing dishes or hands. Consistent, gentle adjustments will provide a comfortable and safe water temperature for all your kitchen needs.
Controlling Water Flow Rate
The Moen one-handle faucet offers effortless control over the water flow rate, adapting to various kitchen tasks. The flow rate is directly linked to how far you push the handle up or down. Gently lifting the handle will initiate a lower flow, ideal for rinsing delicate items or filling small containers.
For increased water pressure, push the handle down further. This maximizes the flow rate, perfect for quickly washing dishes, cleaning large pots, or filling the sink. Experiment with different handle positions to discover the optimal flow for your specific needs.
Remember that a higher flow rate consumes more water. Be mindful of water conservation and adjust the flow accordingly. Smooth, controlled movements of the handle ensure a consistent and efficient water flow, enhancing your kitchen experience.
Understanding the Handle Movement
The Moen one-handle design prioritizes intuitive operation. The handle controls both water volume and temperature with a single, fluid motion. Moving the handle left and right adjusts the water temperature – left for colder, right for warmer. The further you move it in either direction, the more pronounced the temperature change will be.
Up and down movement governs the water flow rate. Lifting the handle activates the water flow, while lowering it shuts it off. The height of the handle dictates the water pressure, offering precise control. A gentle lift provides a lower flow, while a full lift delivers maximum pressure.
Practice these movements to become familiar with the faucet’s responsiveness. Smooth, deliberate actions ensure accurate temperature and flow adjustments, enhancing your overall kitchen experience.
Maintenance & Care
Regular cleaning preserves your faucet’s finish and function. Prevent mineral buildup and ensure optimal performance through simple, consistent care practices outlined in this section.
Cleaning Your Moen Faucet
Maintaining a pristine finish on your Moen one-handle pullout kitchen faucet is surprisingly simple with regular cleaning. Daily wiping with a soft, damp cloth will remove water spots and everyday grime, preventing buildup.
For more thorough cleaning, consider a weekly routine. Gently scrub the faucet body and handle with a mild dish soap solution; Avoid abrasive cleaners, scouring pads, or harsh chemicals, as these can damage the finish. Pay particular attention to the base of the faucet and around the handle, where residue tends to accumulate.
Rinse thoroughly with clean water after cleaning, ensuring no soap residue remains. Dry the faucet completely with a soft towel to prevent water spots. For stainless steel finishes, wiping in the direction of the grain will help maintain its luster. Consistent cleaning not only enhances the appearance of your faucet but also contributes to its longevity and smooth operation.
Recommended Cleaning Products
Choosing the right cleaning products is crucial for preserving the beauty and integrity of your Moen one-handle pullout kitchen faucet’s finish. Mild dish soap and warm water are excellent for daily and weekly cleaning, effectively removing grime without causing damage.
For tougher stains or mineral deposits, consider using a dedicated stainless steel cleaner (for stainless steel faucets) or a chrome cleaner (for chrome finishes). Always test the cleaner in an inconspicuous area first to ensure compatibility. White vinegar diluted with water can also be used to dissolve mineral buildup, but avoid prolonged exposure.
Avoid harsh chemicals like bleach, ammonia, or abrasive cleaners, as they can etch, discolor, or corrode the faucet’s surface. Microfiber cloths are ideal for cleaning, as they are non-abrasive and effectively lift dirt and grime. Remember to rinse thoroughly and dry completely after using any cleaning product.
Preventing Mineral Buildup
Mineral buildup, particularly from hard water, is a common issue affecting Moen one-handle pullout kitchen faucets. Proactive measures can significantly reduce its occurrence. Regularly wiping down the faucet after each use with a soft cloth helps prevent water spots and mineral deposits from forming.
Consider installing a water softener if you live in an area with particularly hard water. This will remove minerals like calcium and magnesium before they have a chance to accumulate on your faucet. Periodically flushing the faucet by running both hot and cold water for a few minutes can also help dislodge any developing buildup.
Consistent cleaning, as outlined in the ‘Recommended Cleaning Products’ section, is vital. Addressing mineral deposits early prevents them from becoming stubborn and difficult to remove, preserving your faucet’s functionality and appearance.
Removing and Cleaning the Aerator
The aerator, located at the faucet’s tip, mixes air with water, creating a consistent flow. Over time, mineral deposits and debris can clog the aerator, reducing water pressure. To remove it, gently unscrew the aerator housing – a rubber wrench or pliers with protected jaws can assist.
Once removed, disassemble the aerator components: the housing, screen, and flow restrictor. Soak these parts in white vinegar for at least 30 minutes to dissolve mineral buildup. Use a small brush, like an old toothbrush, to scrub away any remaining residue.
Rinse thoroughly with clean water and reassemble the aerator. Carefully screw it back onto the faucet, ensuring a tight but not overly forceful connection. Regular aerator cleaning – every few months – maintains optimal water flow and spray pattern.

Troubleshooting Common Issues
Facing problems? This section offers solutions for low water pressure, leaks, sprayer malfunctions, and handle issues, helping you quickly restore your faucet’s functionality.
Low Water Pressure Problems
Reduced water flow from your Moen faucet can be frustrating. Several factors can contribute to this issue, and thankfully, many are easily addressed. First, check the aerator – mineral buildup is a common culprit. Unscrew it and clean it thoroughly, removing any debris.
Next, inspect the supply lines. Kinks or blockages can restrict water flow. Ensure they are clear and unobstructed. Also, verify that the shut-off valves under the sink are fully open. Sometimes, these valves aren’t completely turned on after maintenance.
If the problem persists, consider the cartridge within the faucet handle. A worn or damaged cartridge can limit water flow. Replacement might be necessary. Finally, check your home’s overall water pressure. If the pressure is low throughout the house, the issue isn’t isolated to the faucet and may require professional attention. Remember to always turn off the water supply before attempting any repairs!
Leaking Faucet – Identifying the Source
A dripping Moen faucet isn’t just annoying; it wastes water and can lead to damage. Pinpointing the leak’s origin is crucial for effective repair. Start by observing where the water is coming from – the handle, the spout, or the base of the faucet?
Leaks around the handle often indicate a worn-out O-ring or cartridge. These components are relatively easy to replace. Drips from the spout usually point to a faulty cartridge as well. Leaks at the base might signify a loose connection or a deteriorated seal.
Inspect the supply lines and connections under the sink for any signs of moisture. Tighten connections if necessary. If the leak persists, disassemble the faucet (after shutting off the water supply!) to examine the internal components for cracks or damage. A visual inspection will often reveal the source of the problem.
Pullout Sprayer Not Working
If your Moen pullout sprayer isn’t functioning, several issues could be the culprit. First, ensure the sprayer head is securely docked in its housing; it needs to click into place to activate water flow. Check for kinks or obstructions in the sprayer hose – gently pull the hose out and inspect its length.
Mineral buildup can restrict water flow. Detach the sprayer head and soak it in a descaling solution (like vinegar) to dissolve deposits. Inspect the sprayer hose connections at both ends for leaks or disconnections. A loose connection can prevent water from reaching the sprayer.
The diverter valve, located inside the faucet body, may be faulty. This valve directs water to either the spout or the sprayer. If the valve is damaged, the sprayer won’t work. Consider replacing the diverter valve if other solutions fail.
Handle Difficulties – Stiff or Loose
A stiff or loose handle on your Moen faucet often indicates a problem with the cartridge. Over time, mineral deposits can accumulate within the cartridge, causing it to become stiff and difficult to move. Try lubricating the cartridge with a silicone-based plumber’s grease – carefully remove the handle and access the cartridge.
If the handle feels loose, the retaining nut beneath the handle may be insufficiently tightened. Tighten this nut carefully, avoiding over-tightening which could damage the faucet body. Inspect the handle itself for cracks or damage; a damaged handle may not securely grip the cartridge stem.
A worn or damaged cartridge is a common cause of handle issues. Replacing the cartridge is often the most effective solution; Ensure you purchase the correct replacement cartridge for your specific Moen faucet model.

Parts & Replacement

Locating replacement parts is crucial for maintaining your Moen faucet. This section details common parts, purchasing options, warranty details, and a helpful component diagram.
Identifying Common Replacement Parts
Several components of your Moen one-handle pullout kitchen faucet may require replacement over time due to wear and tear. Understanding these parts simplifies maintenance and repairs.
Commonly replaced items include the aerator, which can become clogged with mineral deposits, reducing water flow. The O-rings and seals within the faucet body and sprayer hose are prone to deterioration, leading to leaks. The cartridge, responsible for controlling water temperature and flow, may also need replacing if the handle becomes stiff or drips.
The pullout hose itself can develop kinks or cracks, necessitating replacement. Additionally, the spray head can wear out, impacting spray pattern and pressure. Finally, the handle and its associated screw may require attention if the handle becomes loose or damaged.
Always refer to your faucet’s model number when ordering parts to ensure compatibility. A detailed parts diagram (found later in this guide) can further assist in accurate identification.
Where to Purchase Replacement Parts
Finding replacement parts for your Moen one-handle pullout kitchen faucet is readily achievable through several convenient channels. For genuine Moen parts, the official Moen website (moen.com) is an excellent starting point, offering a comprehensive catalog and direct ordering capabilities.
Major home improvement retailers such as Home Depot and Lowe’s stock a wide selection of Moen faucet parts both in-store and online. These stores often allow you to search by faucet model number for precise matches. Additionally, plumbing supply stores, both local and national chains, are valuable resources.
Amazon and other online marketplaces also carry Moen replacement parts, but it’s crucial to verify the seller’s authenticity to ensure you’re receiving genuine Moen products. When in doubt, contacting Moen’s customer support directly can provide guidance on authorized retailers and part numbers.
Keep your model number handy when purchasing to guarantee compatibility and a successful repair.
Moen Warranty Information
Moen stands behind the quality of its products with a comprehensive warranty program. For most one-handle pullout kitchen faucets, Moen offers a lifetime limited warranty against defects in materials and workmanship to the original purchaser.
This warranty covers finishes, and all operating parts. It does not cover damage resulting from improper installation, misuse, abuse, or normal wear and tear. Scratches, corrosion, or discoloration due to cleaning products are also typically excluded.
To make a warranty claim, you’ll generally need to provide proof of purchase (receipt or invoice) and a description of the defect. Contact Moen’s customer service through their website (moen.com) or by phone to initiate the claim process.
Registration of your faucet is recommended, but not required, for warranty coverage. Detailed warranty information, including specific terms and conditions, can be found on the Moen website or in the documentation included with your faucet.
Diagram of Faucet Components
Understanding the internal structure of your Moen one-handle pullout faucet is crucial for maintenance and repairs. This section provides a visual breakdown of key components.
Major parts include: the faucet body, handle assembly, cartridge, pullout sprayer hose, spray head, aerator, water supply lines connections, and the weight that facilitates smooth hose retraction. The cartridge controls water flow and temperature mixing.
The pullout sprayer consists of the hose, a flexible connector, and the spray head itself, often featuring multiple spray patterns. The aerator, located at the spout’s end, mixes air with water for a consistent stream.
Detailed exploded diagrams are typically available on the Moen website (moen.com) under the “Support” or “Parts” section. These diagrams clearly label each component, aiding in identification when ordering replacements or performing repairs. Refer to your specific model number for the most accurate diagram.